Want to set up WordPress email confirmation for new users on your site?
If you allow public registration on your site, requiring email confirmation is a great way to cut down on spam and make sure your members are entering valid email addresses.
With the free Profile Builder plugin, you can easily create a custom registration form and require email confirmation for new users. And in this post, we’ll show you exactly how to set it up. Keep reading for the full step-by-step guide!
How to Set Up WordPress Email Confirmation for New Users
Profile Builder is a full-service solution for WordPress registration and user profiles. You can use the free version at WordPress.org to enable most of the features in this tutorial and there’s also a premium version that offers more features, such as the ability to create multiple unique registration forms and require admin approval for certain user roles.
Here’s the basic process to require email confirmation for new users – we’ll show you the full guide below:

Soundcore by Anker Q20i Hybrid Active Noise Cancelling Headphones, Wireless Over-Ear Bluetooth, 40H Long ANC Playtime, Hi-Res Audio, Big Bass, Customize via an App, Transparency Mode (Black)
$41.06 (as of May 28, 2026 09:23 GMT +00:00 - More infoProduct prices and availability are accurate as of the date/time indicated and are subject to change. Any price and availability information displayed on [relevant Amazon Site(s), as applicable] at the time of purchase will apply to the purchase of this product.)- Create a custom front-end registration form with Profile Builder;
- Create a confirmation page that users will see after confirming their emails;
- Enable email confirmation for new users;
- Manually approve or delete users if needed (in cases where they don’t click the approval email).
Before you begin, make sure to install and activate at least the free version of Profile Builder from WordPress.org. Or, purchase the premium version to unlock all of the features.
Profile Builder Pro
The easiest way to require email confirmation for new WordPress users.
1. Set Up a Custom Registration Form
To get started, you’ll use Profile Builder to create a custom registration form. This is not only more user-friendly for your users, but it also lets you add useful features that the default WordPress registration form doesn’t allow.
For example, you can add an extra email confirmation form field to make sure users enter the right email address (so that they’ll receive their confirmation emails).
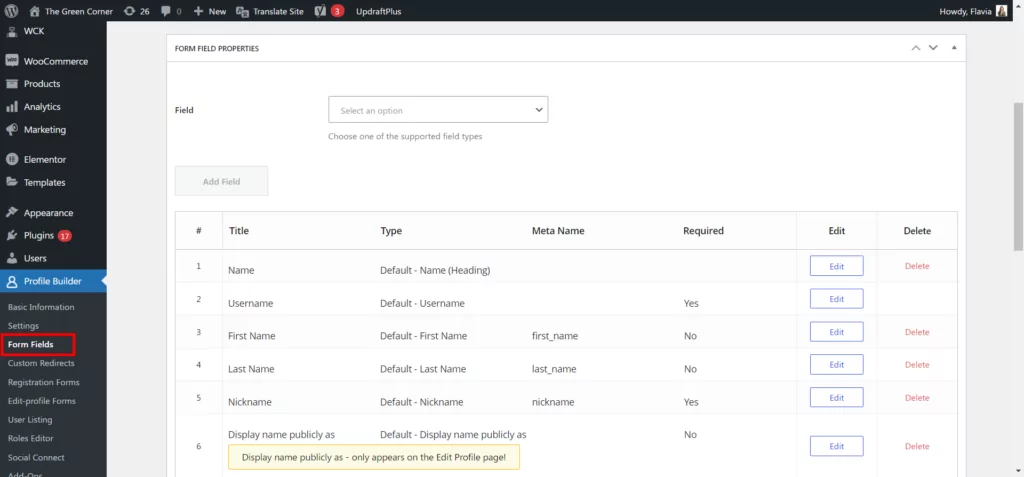
To customize your registration form, go to Profile Builder → Form Fields. In this interface, you can:
- Add new fields using the drop-down at the top. With the premium version, you can even add custom fields to collect additional information beyond the default WordPress profile fields.
- Change the order of fields using drag-and-drop – click on the “#” column on the left to access the drag-and-drop functionality.
- Delete existing fields.
- Edit and customize fields by clicking the Edit Button. For example, you can mark certain fields as required or optional.
For example, to add an email confirmation field to ensure accurate email addresses, you can simply select the Email Confirmation field and insert it into your form:

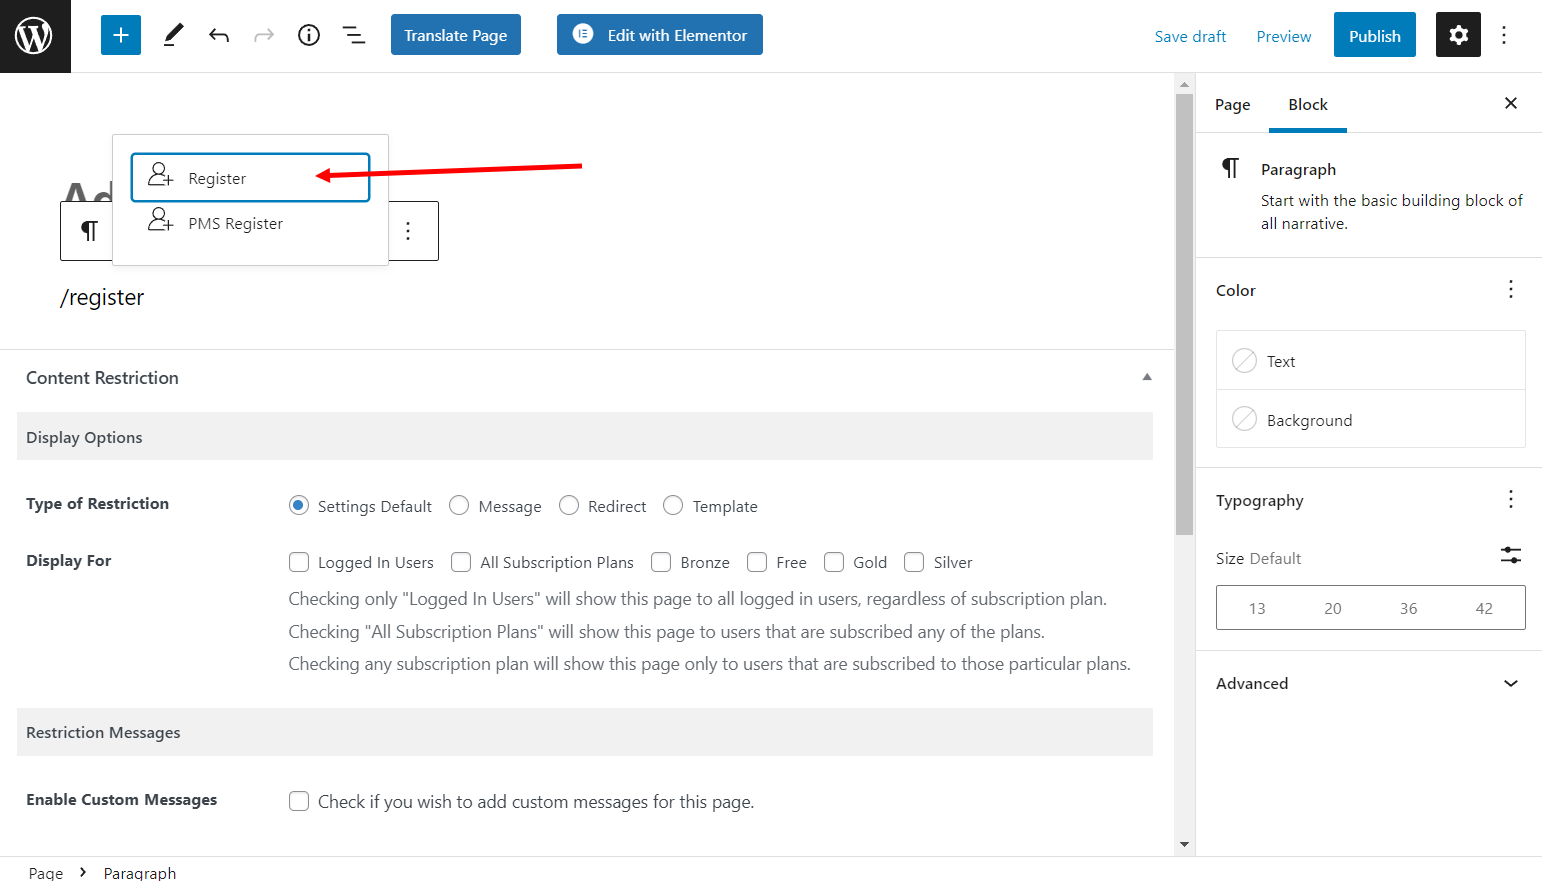
Once you’re happy with your registration form, you can display it anywhere on your site using the [wppb-register] shortcode, or simply by searching for the Registrater block in the Gutenberg editor. You can also add a role parameter to assign people who use this form to a certain user role, like so – [wppb-register role="author"].
Here’s an example of what your registration form might look like:

If you’re using Elementor, you’ll also get dedicated Elementor widgets to display your registration form.
2. Create Your Email Confirmation Page
Next, you’ll want to create your email confirmation page. This is the page that new users will see after they click the confirmation link in the email that your site sends them.
You can create your confirmation page just like a regular WordPress page – just go to Pages → Add New.
You can include whatever content you want, but we recommend including information that will help users get up and running on your site.
For example, if you have a membership site, you could highlight some key actions that new members should take. Or, you could include links to key pages on your site.
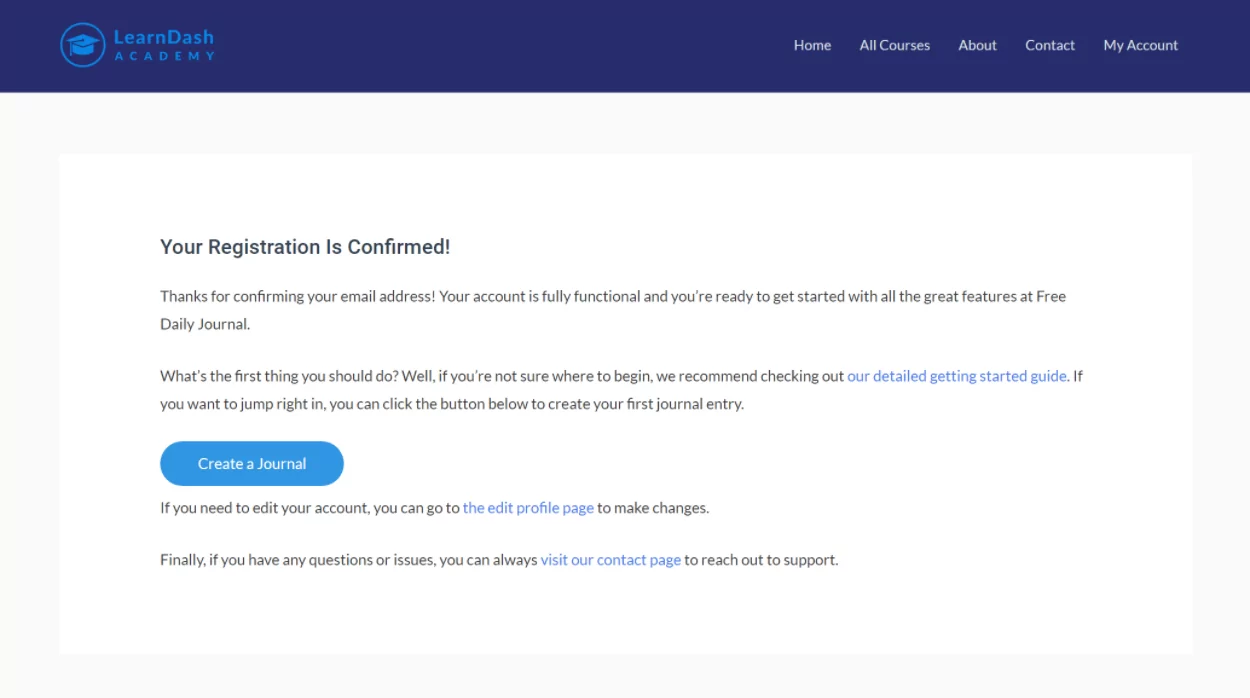
Once you’re happy with the page, go ahead and publish it. Here’s an example of what it might look like:
3. Enable WordPress Email Confirmation for New Users
Now, you’re ready to enable WordPress email confirmation for new users.
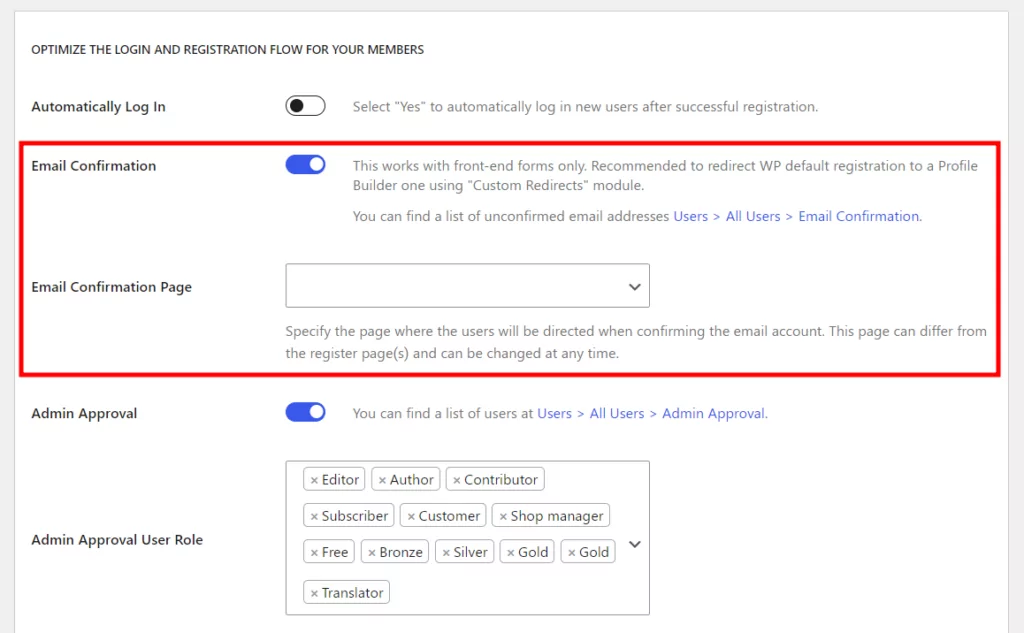
To do this, go to Profile Builder → Settings and set the “Email Confirmation” Activated drop-down equal to Yes.
This will expand an additional “Email Confirmation” Landing Page setting where you can select the custom confirmation page that you created in the previous step:
And that’s it! Your custom registration page is now live and new registrants will need to confirm their email to activate their account.
If you’re having trouble with your confirmation emails making it to new users’ inboxes, we recommend using a dedicated email sending service instead of the default WordPress PHP Mail method. You can set this up using Amazon SES.
How to Manually Approve or Delete Users That Haven’t Confirmed Their Emails
Most of your users will confirm their emails right away. However, you might have some users who don’t confirm their emails.
By default, WordPress stores these users in the wp_signups database table, which means you can’t access them from the All Users area in your WordPress dashboard.
That turns into a problem when:
- the user deletes the WordPress confirmation email before activating their account;
- the confirmation email ends up in the spam folder;
- the email doesn’t get sent at all due to a server error.
When the above happens, there are three problems that appear:
- the user can’t approve his account;
- the user can’t try to register again with the same email or username (since WordPress is still waiting for the previous account to approve his registration);
- the admin can only delete the un-confirmed email from the database and can’t manually approve the account.
Don’t worry! With Profile Builder, you won’t need to dig into the wp_signups table just to manage these users. You can delete them or manually approve them from a simple interface.
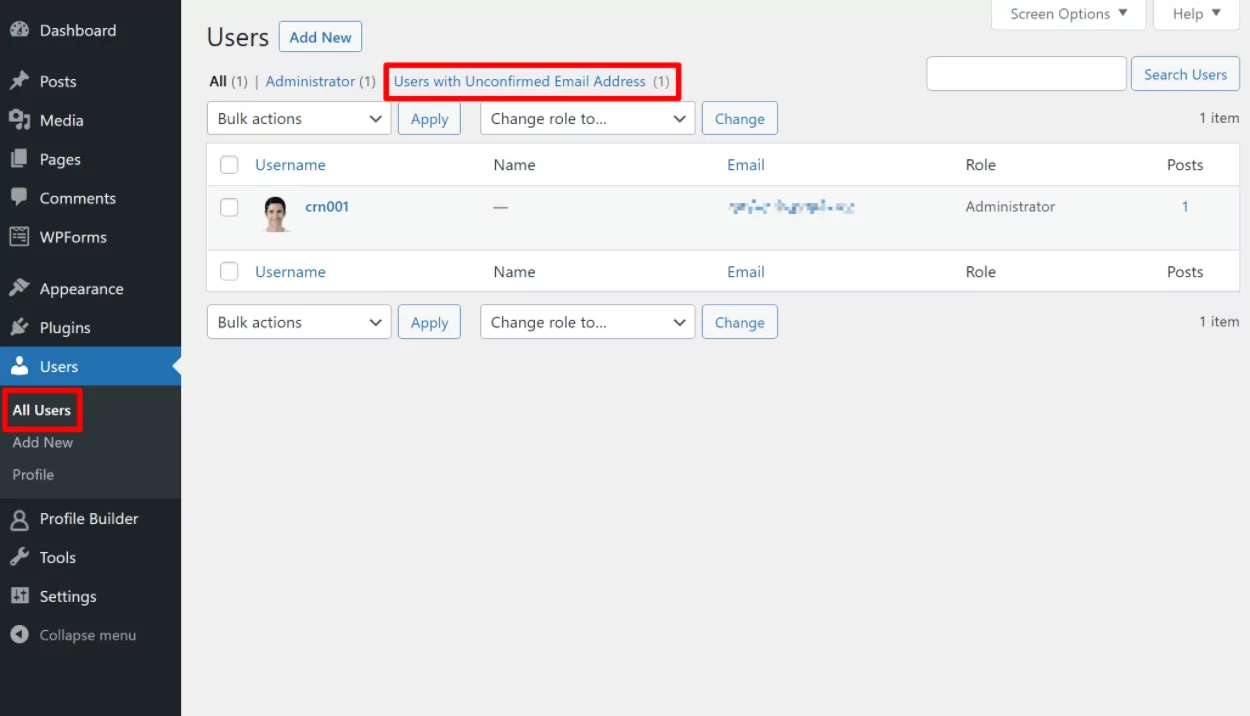
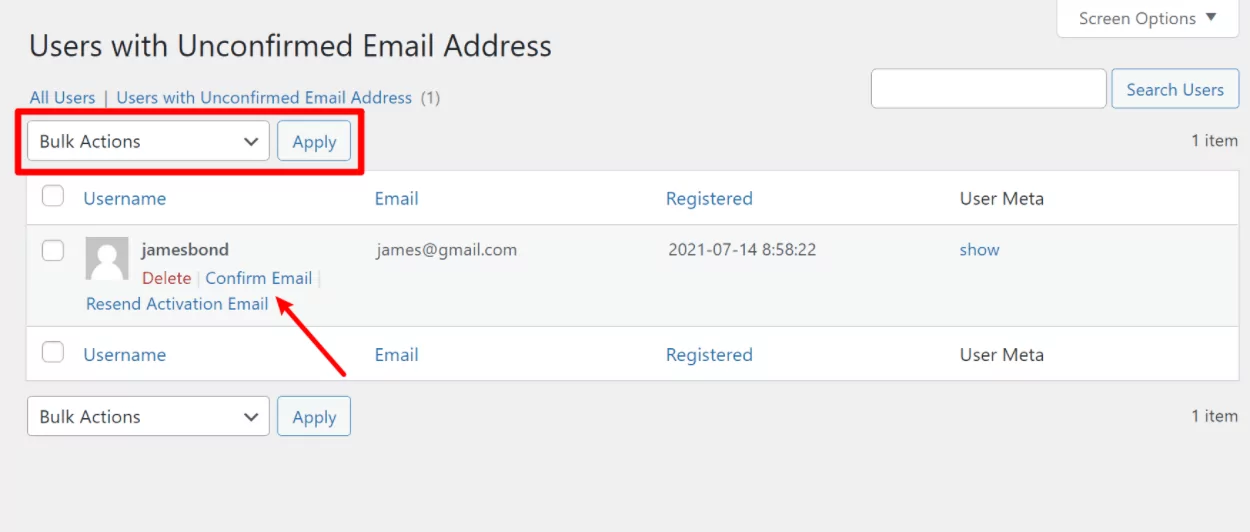
To begin, go to Users → All Users. From there, you can select the Users With Unconfirmed Email Address link to view only users who haven’t confirmed their email address:
Then, you can hover over an unconfirmed user to access three actions:
- Resend the confirmation email;
- Manually confirm the user;
- Delete the user.
You can also use the Bulk Actions drop-down to quickly apply these actions to multiple users:
Enable WordPress Email Confirmation for New Users Today
Profile Builder gives you an easy way to create a custom registration form and require email confirmation for new WordPress users.
When users confirm their emails, you can send them to a custom confirmation page and you can also easily approve or delete users who don’t confirm their email addresses right from your WordPress dashboard.
You can access most of these features in the free version at WordPress.org. Then, consider upgrading to the premium version for the option to create multiple unique registration forms, require admin approval for certain user roles, and lots more.
Profile Builder Pro
The easiest way to require email confirmation for new WordPress users.
Do you have any questions on how to enable email confirmation for new users? Ask them in the comments section below.
Source: https://www.cozmoslabs.com/14722-wordpress-email-confirmation/