Having a WordPress form builder for user registration on your WordPress site saves you from having to create user accounts manually. In other words, you can give prospective students, members, or customers the option to create their own user account. This way, they don’t have to get in touch with you using a contact form to create their accounts.
In addition to this, a good WordPress form builder is fully customizable which means it delivers better user experience. Plus, using a WordPress form builder plugin saves you a lot of time (and effort) as compared to creating a form from scratch.
Profile Builder Pro is a WordPress form builder plugin that helps you add front-end user registration, profile, and login forms to your website. It’s incredibly easy to use and requires no technical knowledge to get started with.
Using the Profile Builder Pro WordPress form plugin, you can fully customize your user registration form. You can also leverage advanced form building features including the option to add extra fields, create multiple forms, configure conditional logic, leverage repeater fields, and add reCAPTCHA. In addition to this, you can create different forms for different user roles, require admin approval, and set up email confirmation to prevent spam registrations.
In this step-by-step tutorial, we’ll show you how you can use a WordPress form builder plugin to create and customize user registration forms on your website.
Amazon Basics Surge Protector Power Strip, 6-Outlet, 790 Joules, Circuit Breaker, LED Indicator, 6ft Extension Cord, White
$11.08 (as of July 30, 2026 06:41 GMT +00:00 - More infoProduct prices and availability are accurate as of the date/time indicated and are subject to change. Any price and availability information displayed on [relevant Amazon Site(s), as applicable] at the time of purchase will apply to the purchase of this product.)How to Build Custom User Registration Forms using a WordPress Form Builder
The easiest way to build and customize user registration forms in WordPress is by using a form plugin. More specifically, you need a user-friendly WordPress form builder plugin, like Profile Builder Pro, that gives you everything you need to automate the user registration process. This saves you from having to go through contact form entries to manually create user accounts.
For most websites, a simple contact form plugin, like Ninja Forms, WP Forms, Gravity Forms, or Formidable Forms, simply won’t cut it.
Here, we’ll show you how you can use Profile Builder Pro to build and customize user registration forms for your WordPress website. The free version of the plugin lets you get started and, whenever you’re ready to use advanced features, you can upgrade to the premium version.
Step #1: Set up front-end user registration and login
WordPress form builder plugins for user registration should give you the option to create front-end registration, login, and profile forms.
")
With Profile Builder Pro, all you have to do is click the Create Form Pages button after installing and activating the plugin to automatically create all three pages.
The plugin will automatically create a Login, Register, and Edit Profile page complete with front-end forms. This is the easiest way to create a front-end user registration form in WordPress.
It also makes it easy for users to log into their accounts and edit their profile information directly from the front-end. By letting users edit their own profiles, you don’t have to deal with profile update requests made through your contact form.
If you’d like to create these pages manually or add a form to a widget instead of a page, you can use the following shortcodes:
- User registration form – [[wppb-register]]
- Login form – [[wppb-login]]
- Edit profile form – [[wppb-edit-profile]]
Unlike Ninja Forms, WP Forms, Gravity Forms, or Formidable Forms, Profile Builder Pro creates these form pages for you automatically. Form submissions are stored in your database.
Step #2: Add extra fields and reCAPTCHA
One of the great features on offer with the Profile Builder Pro plugin is that it makes it easy for users to customize their front-end user registration forms. This makes it a powerful yet flexible WordPress form builder.
Profile Builder Pro comes with 14 default field types including a name field, contact information, email, password, etc… in addition to 29 extra field types that you can add to your user registration form. These include headings, WYSIWYG, file upload, radio buttons, checkboxes, Google reCAPTCHA (like in contact forms), and many more.
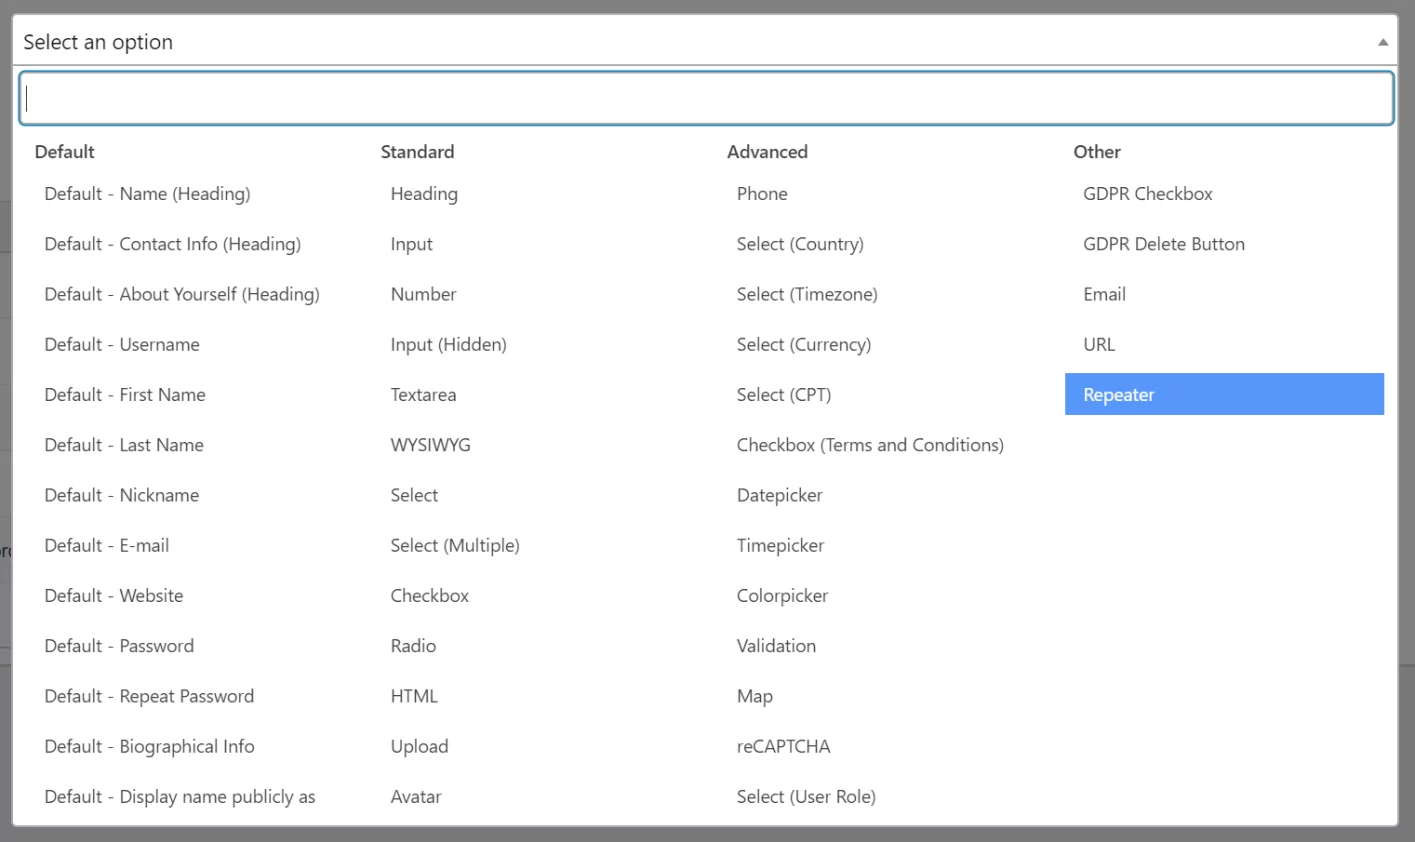
Head over to Profile Builder > Form Fields to add, edit, delete or re-order form fields on your user registration form.
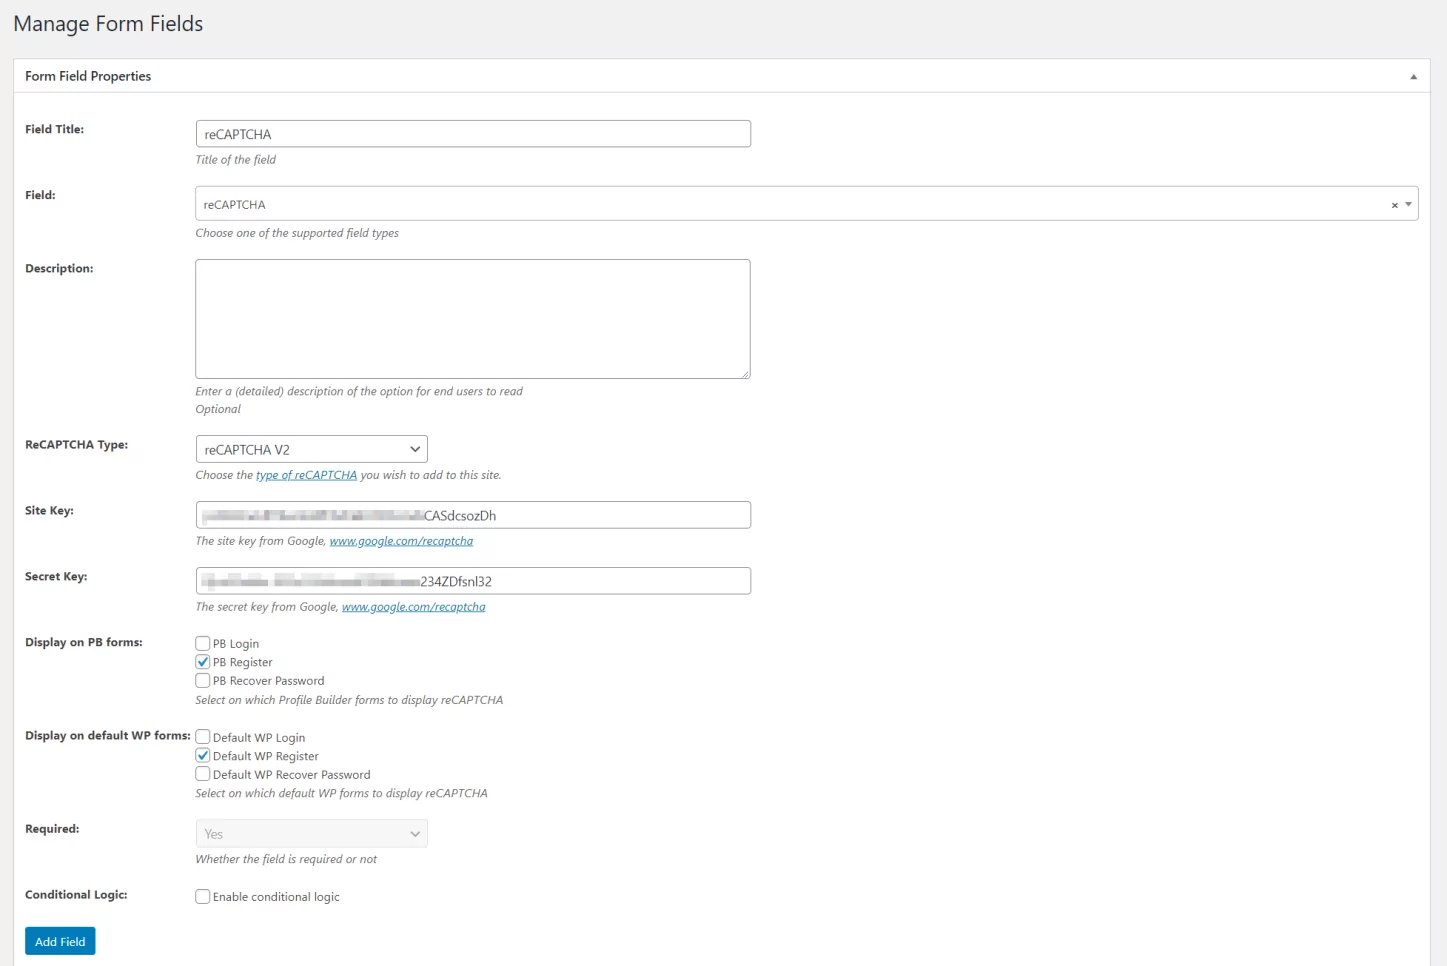
For example, if you wanted to add a reCAPTCHA field to the bottom of your user registration form, you would simply use the Field dropdown to select the reCAPTCHA field type. Then, you would enter the Form Field Properties and click the Add Field button to add it to your form.
Profile Builder Pro lets you choose between reCAPTCHA V2 and Invisible reCAPTCHA to add to your user registration form. In addition to this, the Manage Form Fields page provides an AJAX drag-and-drop interface that you can use to sort and re-order fields however you’d like.
Step #3: Configure conditional logic
Powerful WordPress form builder plugins, like Profile Builder Pro, let users configure conditional logic. In simple terms, it allows you to show or hide selected form fields based on the user’s input.
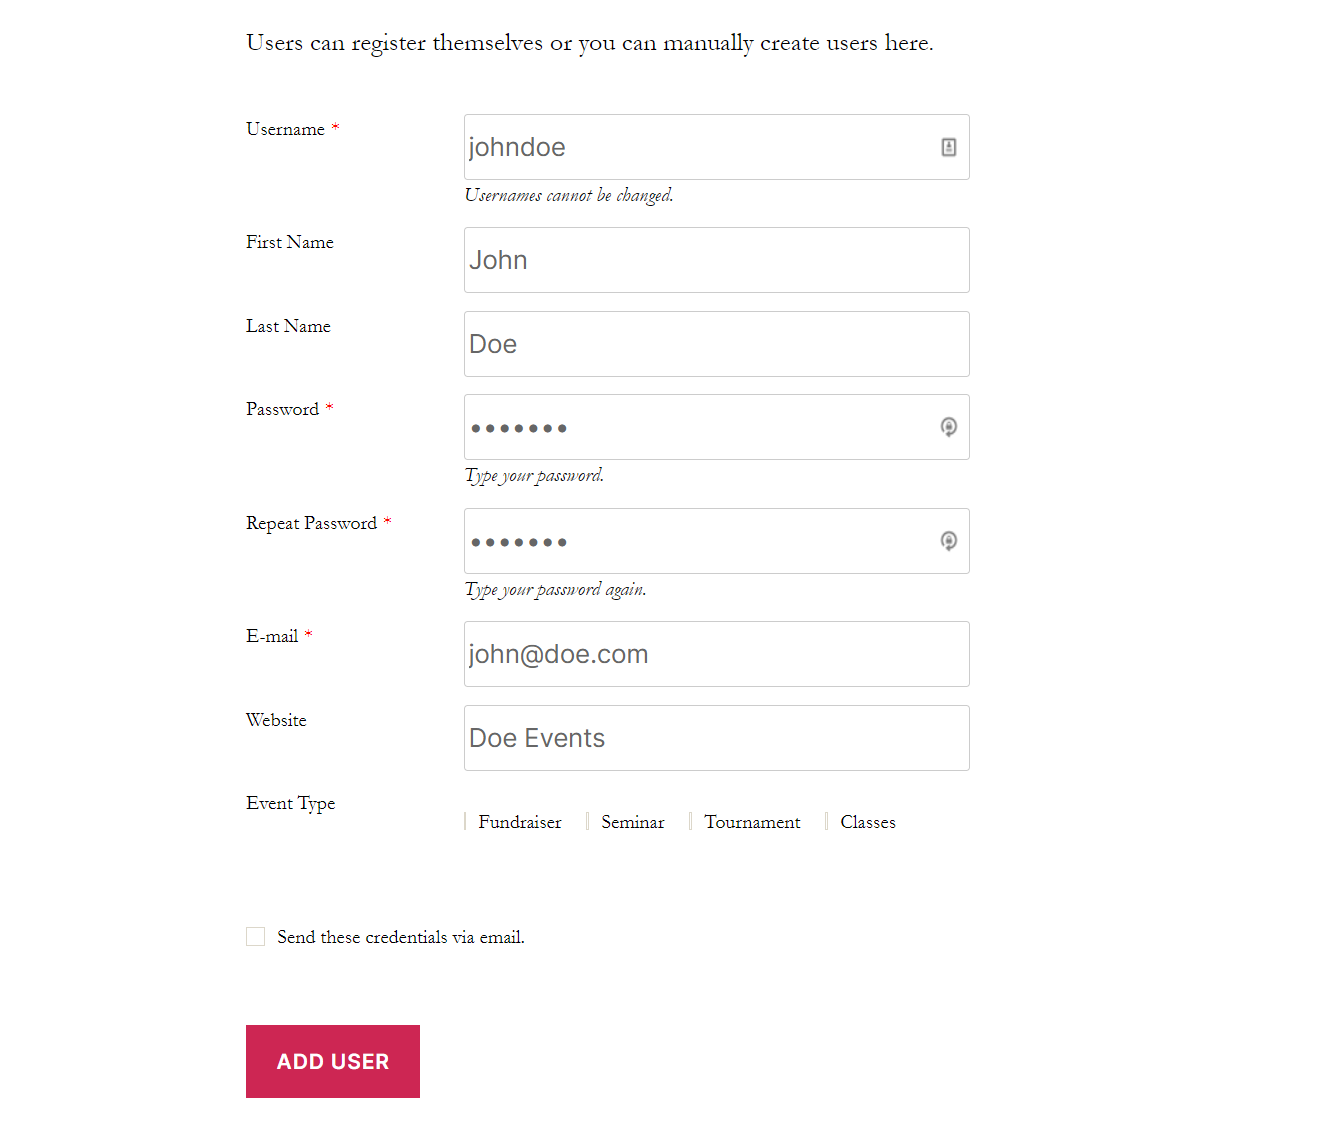
For example, let’s say you’re creating a user registration form to allow businesses to book your event company for different types of events. Before the user can fill out the event details (such as event name and date), they have to choose the type of event they’d like to organize.
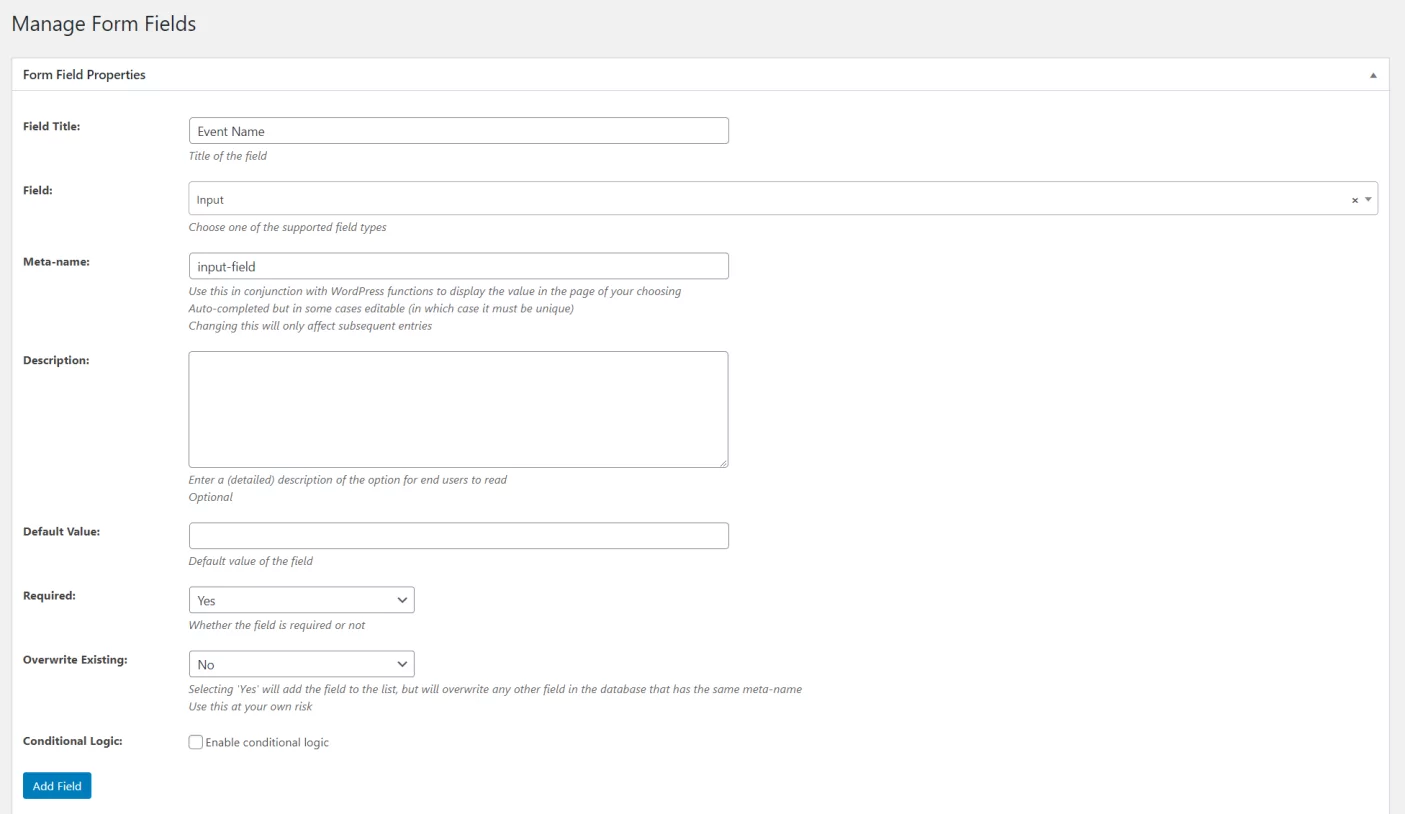
For this, you would add an Input field to your form and enable the Conditional Logic option. Next, you’d set the Conditional Rules as follows:
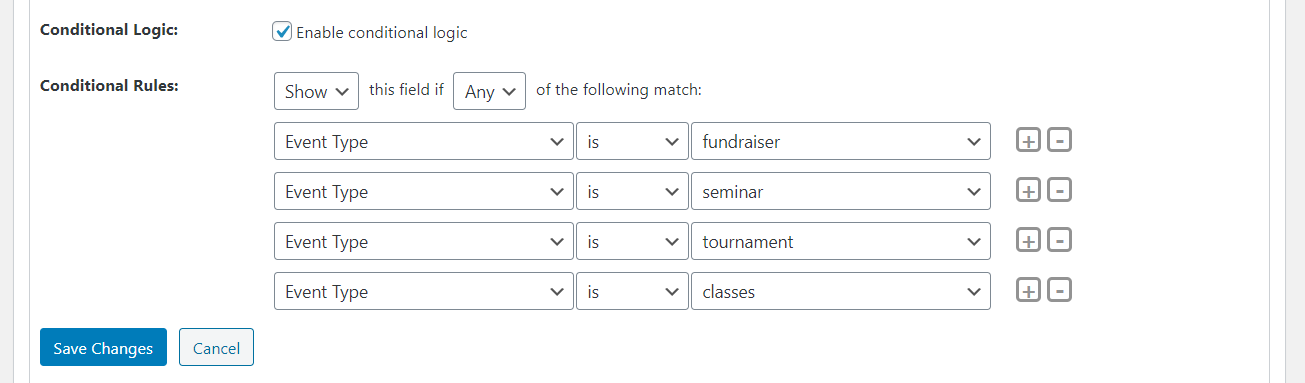
Finally, click the Add Field button to proceed. You can follow the same steps to configure conditional logic for as many form fields as you’d like. Following our example, you might want to configure conditional logic for the Datepicker field, as well.
It will look something like this on the front-end:
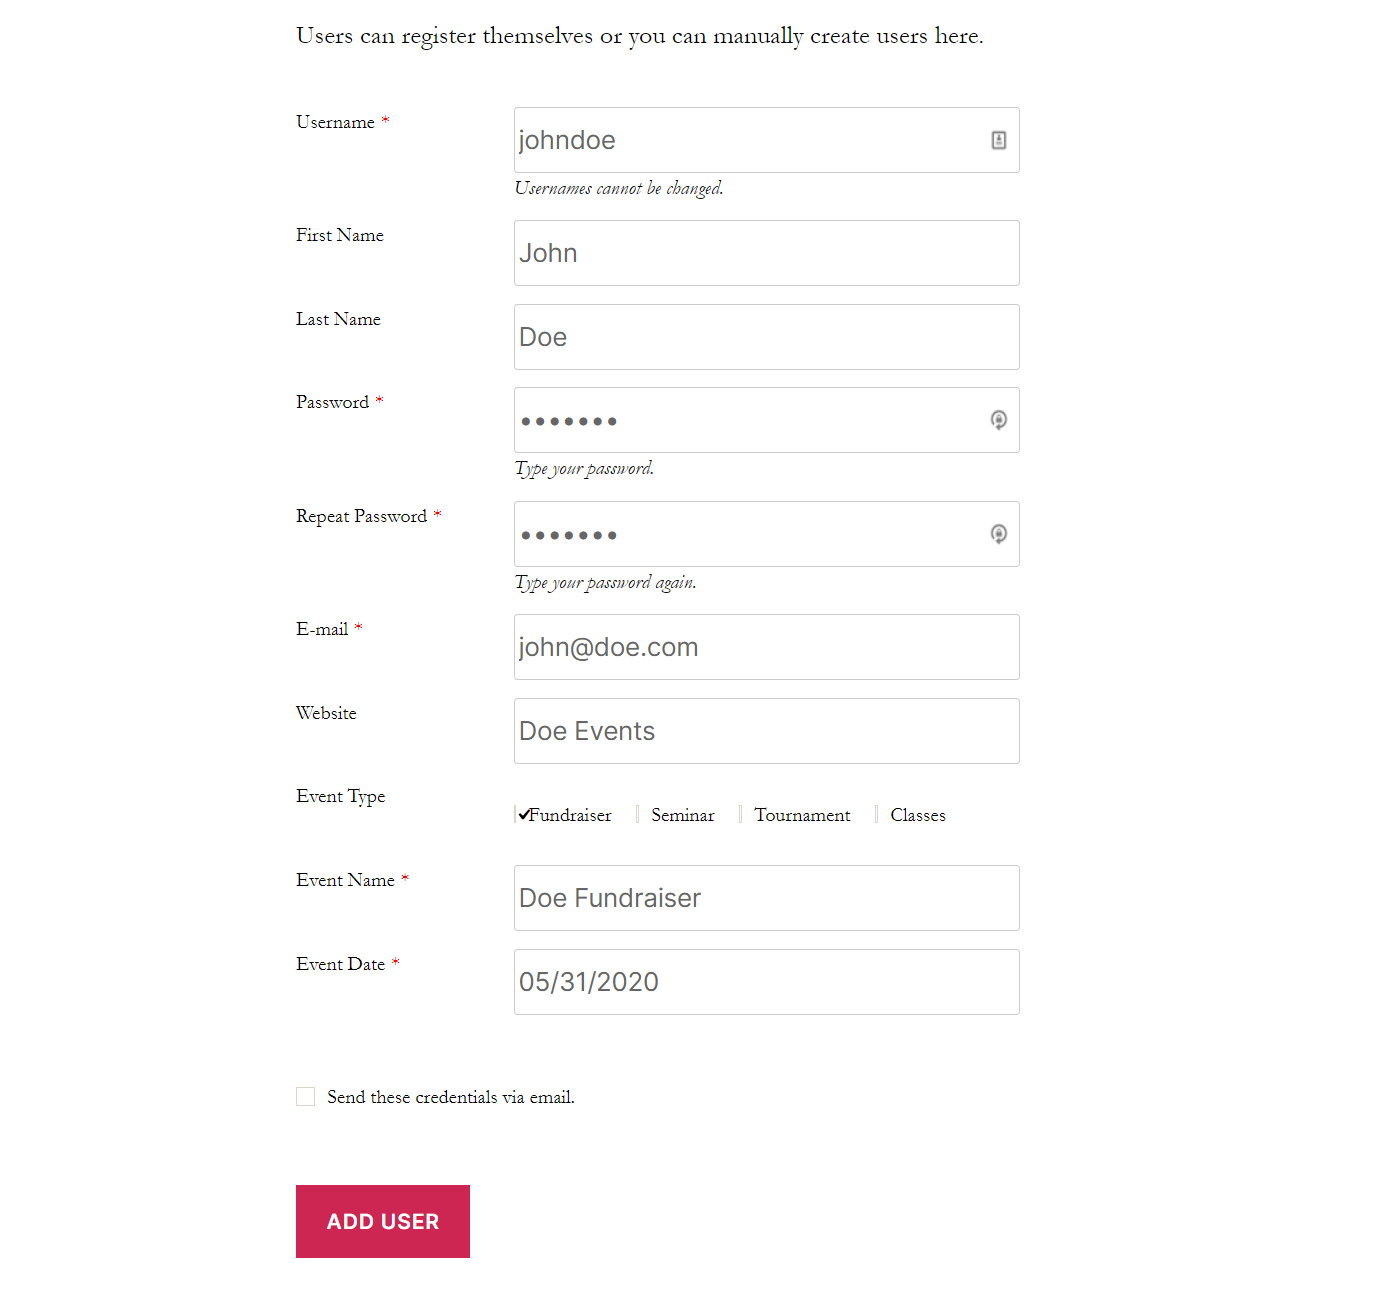
Notice how the Event Name and Event Date fields appear after the user selects an Event Type. Profile Builder Pro makes it easy to configure conditional logic rules.
Step #4: Use repeater fields
Depending on the type of user registration form you’re creating, you might need to add repeater fields to your form. Repeater fields let users generate fields (or groups of fields) by themselves on the front-end.
For example, if you’re organizing an event and want to create a user registration form that allows one person to register multiple attendees, you can create repeater fields to collect information about the attendees.
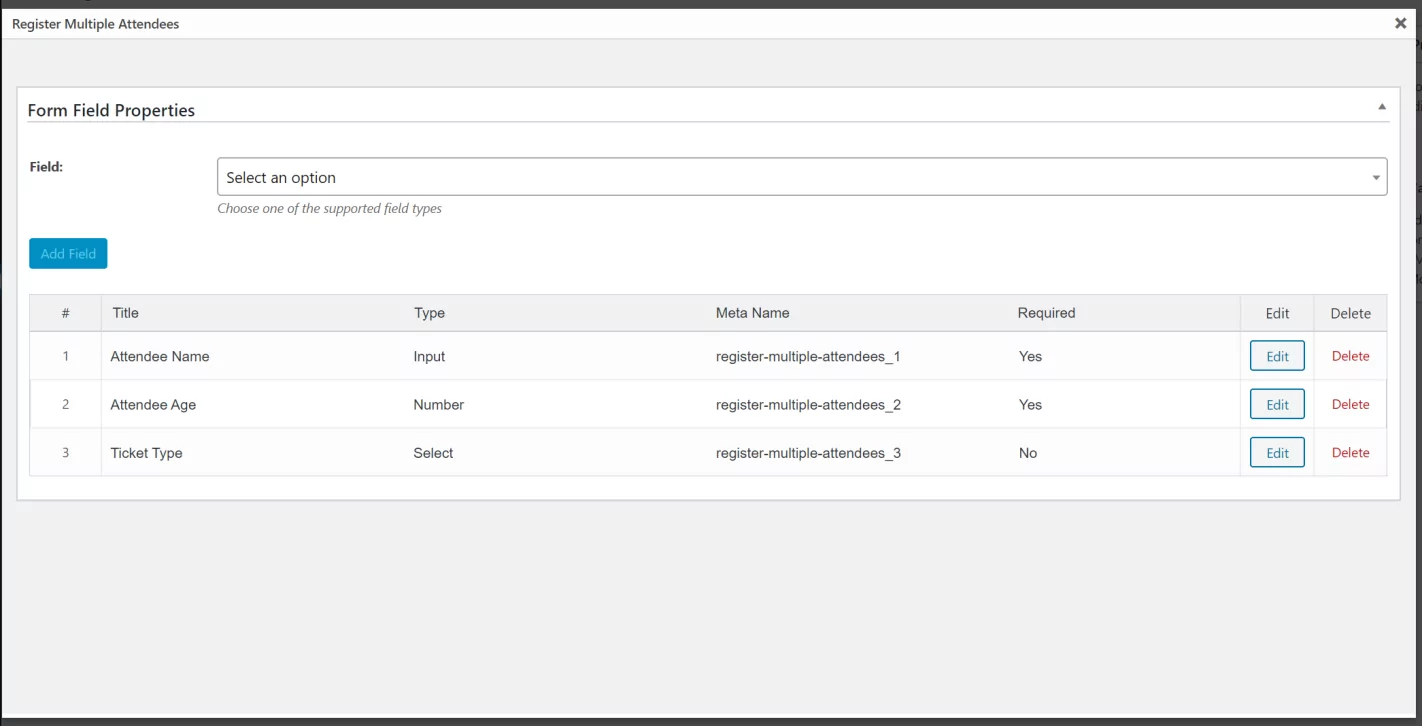
The repeater fields you add to your user registration form might be:
- Attendee Name
- Attendee Age
- Ticket Type
This makes it easy to set up group registrations.
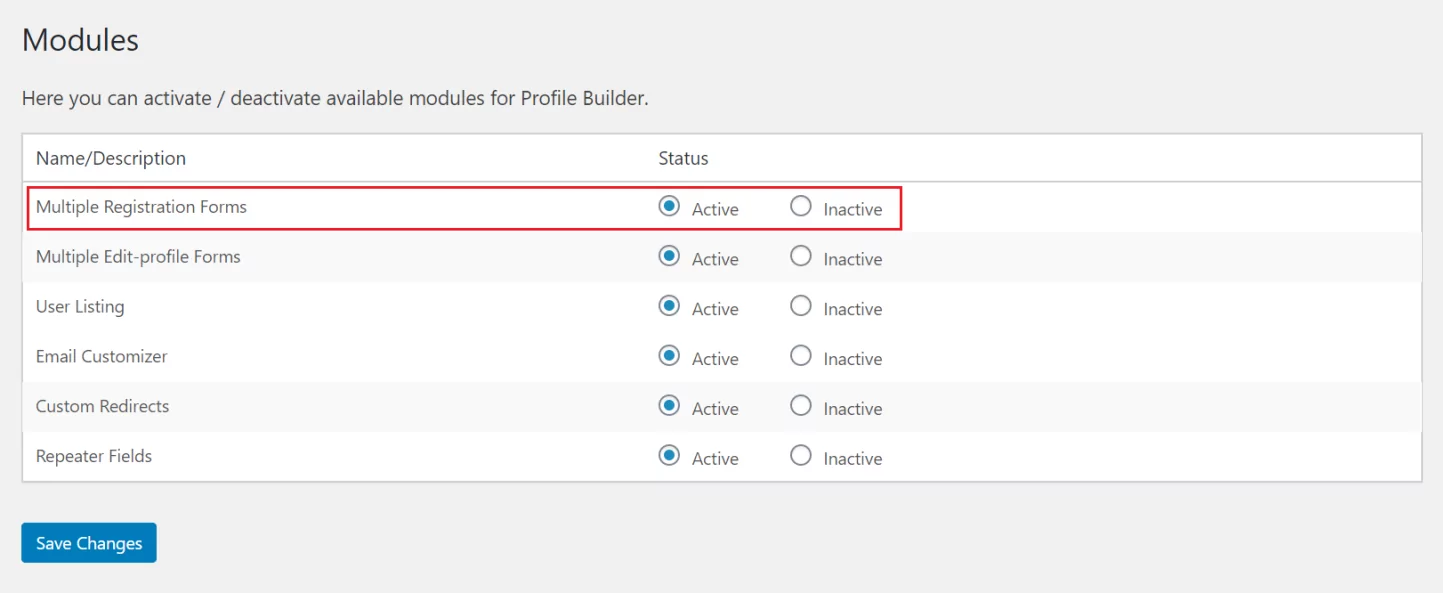
To add repeater fields to your online forms, go to Profile Builder > Modules and set Repeater Fields to Active.
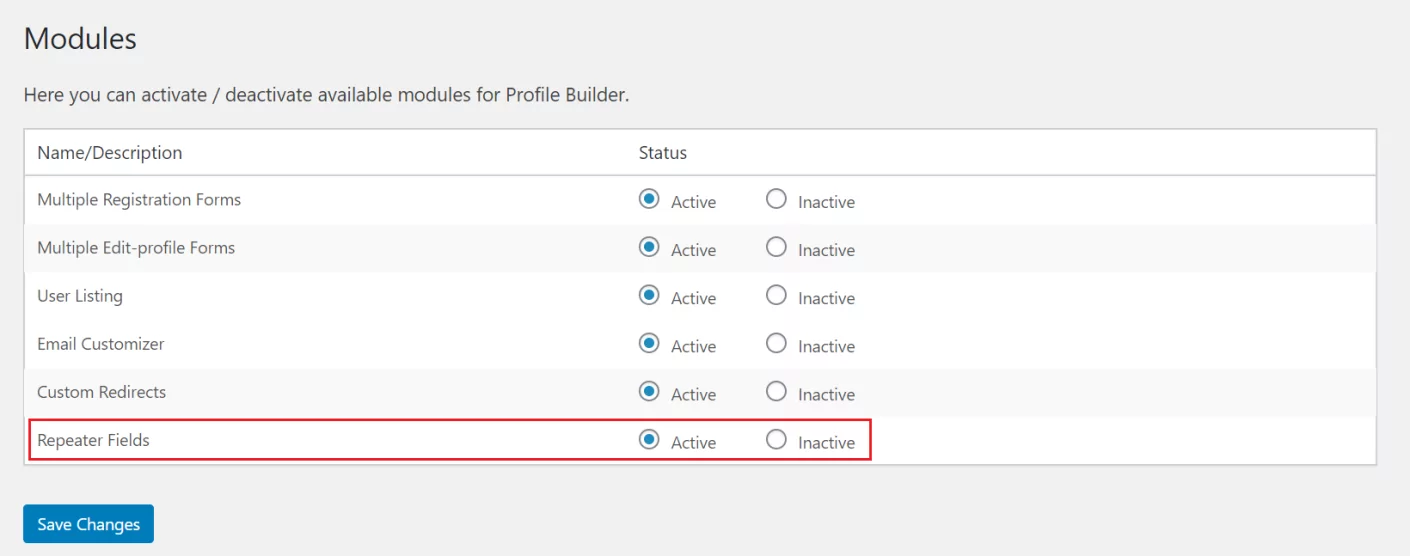
Click the Save Changes button. Next, navigate to Profile Builder > Form Fields and add a Repeater Field to your form.
Fill out the Form Field Properties. Profile Builder Pro lets you limit how many repeater fields each user can generate on the front-end. This allows you to prevent users from generating more fields than necessary. In addition to this, you can also limit repeater fields by user role.
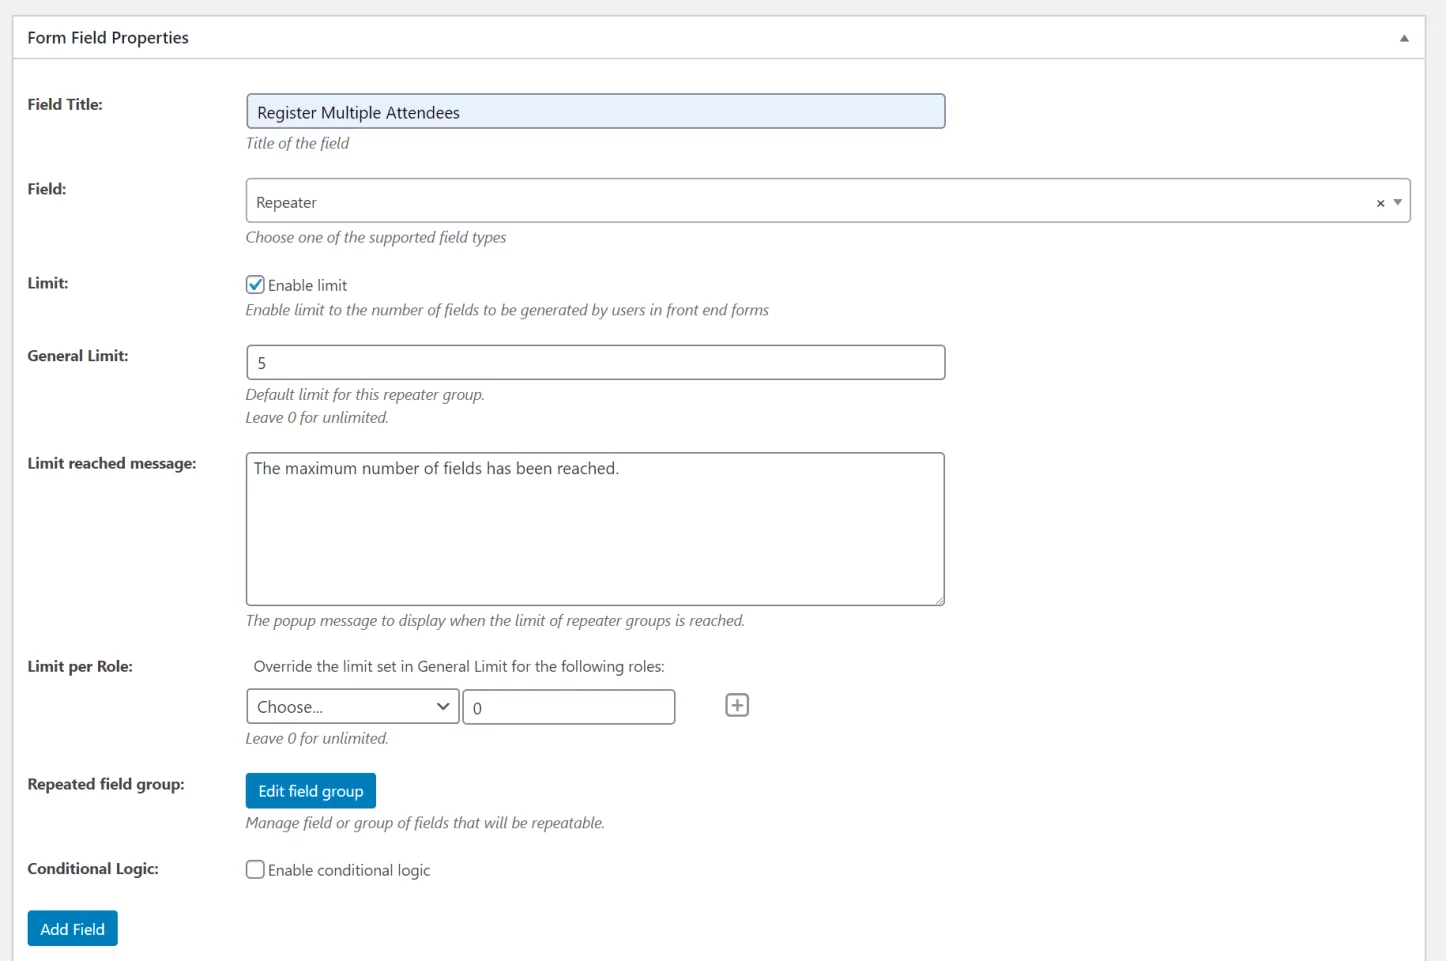
You’ll also need to set the Repeated field group option to define which field (or group of fields) should be repeated. For this, click on the Edit field group button to get started.
Click the Save Changes button to proceed. The user registration form will look something like this on the front-end:
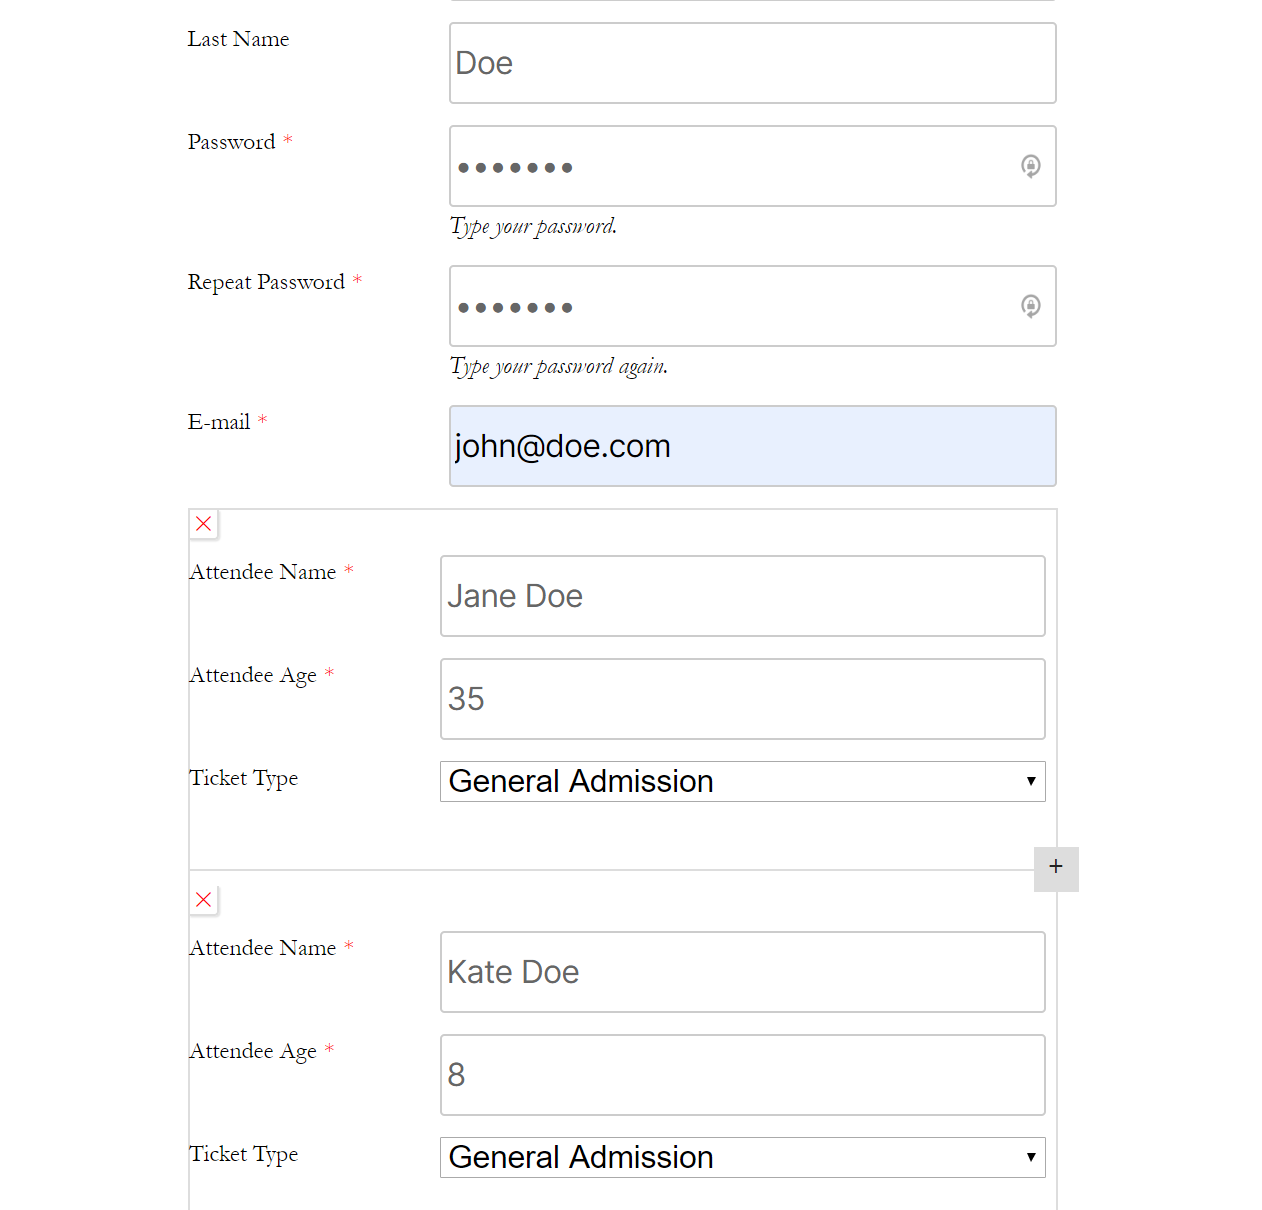
Users can click the plus icon (+) to add repeater fields to their user registration form.
Step #5: Create multiple forms
Depending on the type of website or program you’re running, you might need to create different types of forms for user registration. The Profile Builder Pro WordPress form builder makes this incredibly easy with its Multiple Registration Forms module. This way, you’re not restricted to pre-built form templates and can create unlimited forms.
The first thing you need to do is head over to Profile Builder > Modules and make sure the Multiple Registration Forms module is set to Active.
Click the Save Changes button. Next, go to Profile Builder > Registration Forms to create multiple user registration forms. Click the Add New button and fill out the After Registration… meta box.
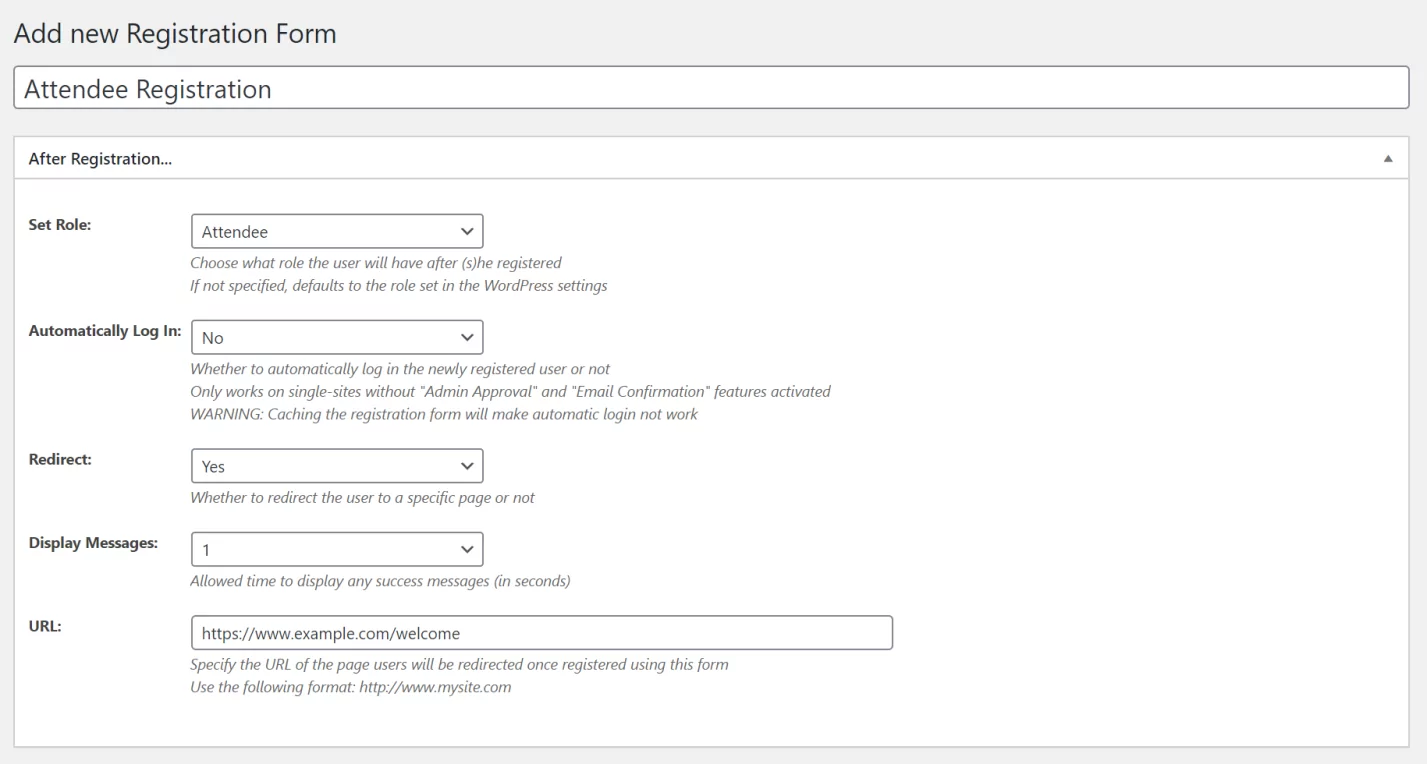
From here, you can:
- Set the role the user will automatically be assigned after they complete their registration.
- Decide whether the user should automatically be logged in after successful registration.
- Which page to redirect the user to e.g. the homepage or a welcome page.
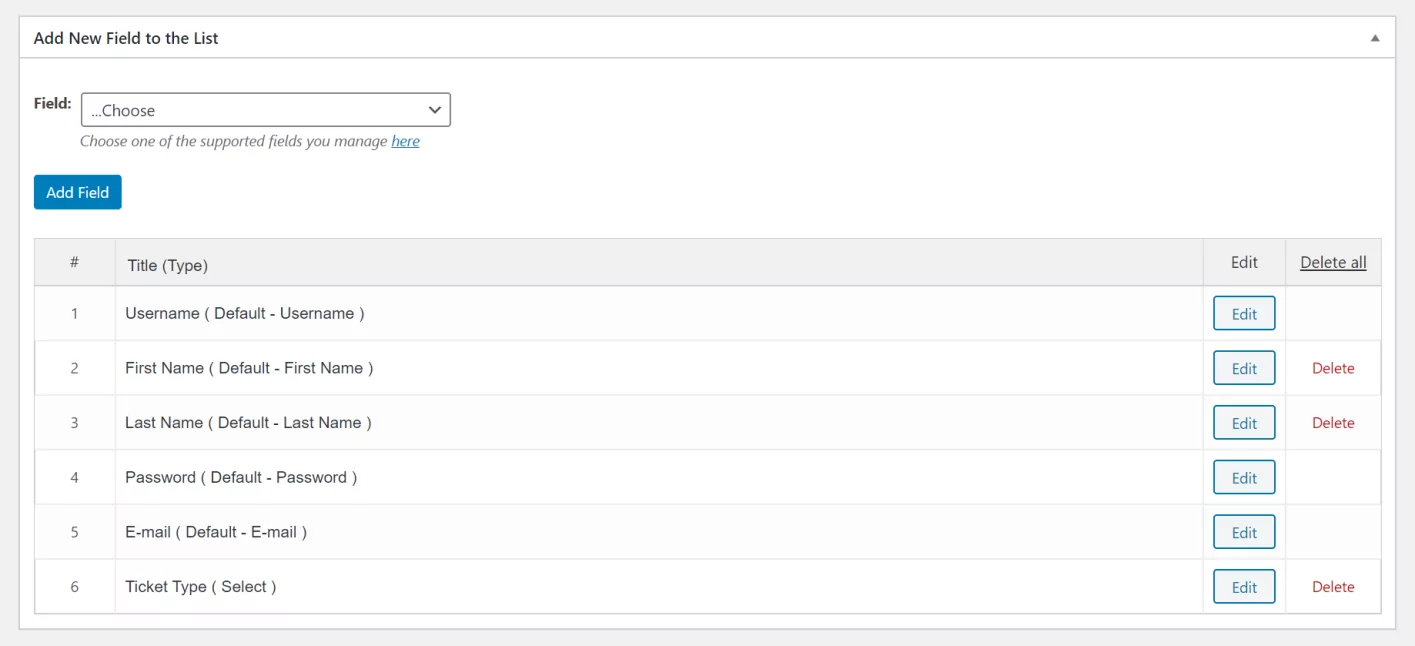
Next, you can use the Add New Field to the List meta box to create the custom user registration form. You can add, edit, delete or re-order (using drag-and-drop) form fields on your user registration form.
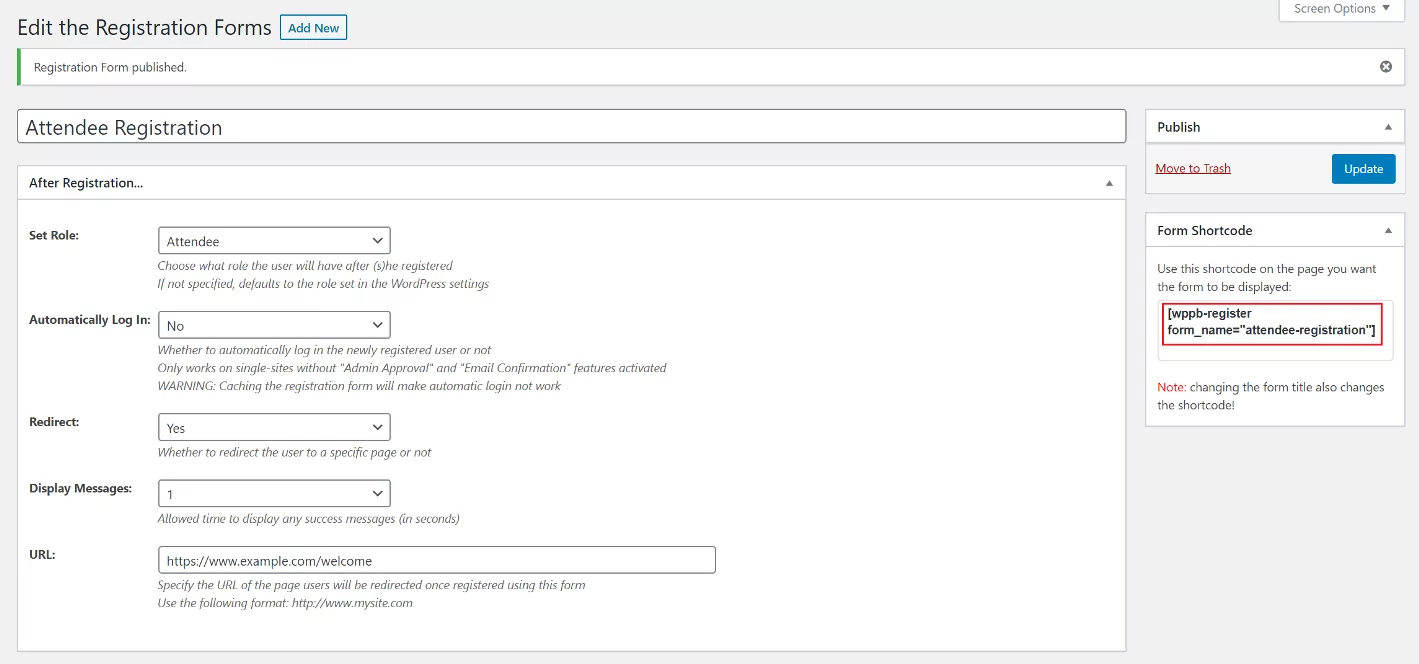
Click the Publish button to continue. A shortcode will appear in the Form Shortcode meta box. Copy-paste this shortcode into any page on your WordPress website to display the user registration form on the front-end.
Repeat these steps to create as many user registration forms as you need for your website. The user registration form will look something like this on the front-end:
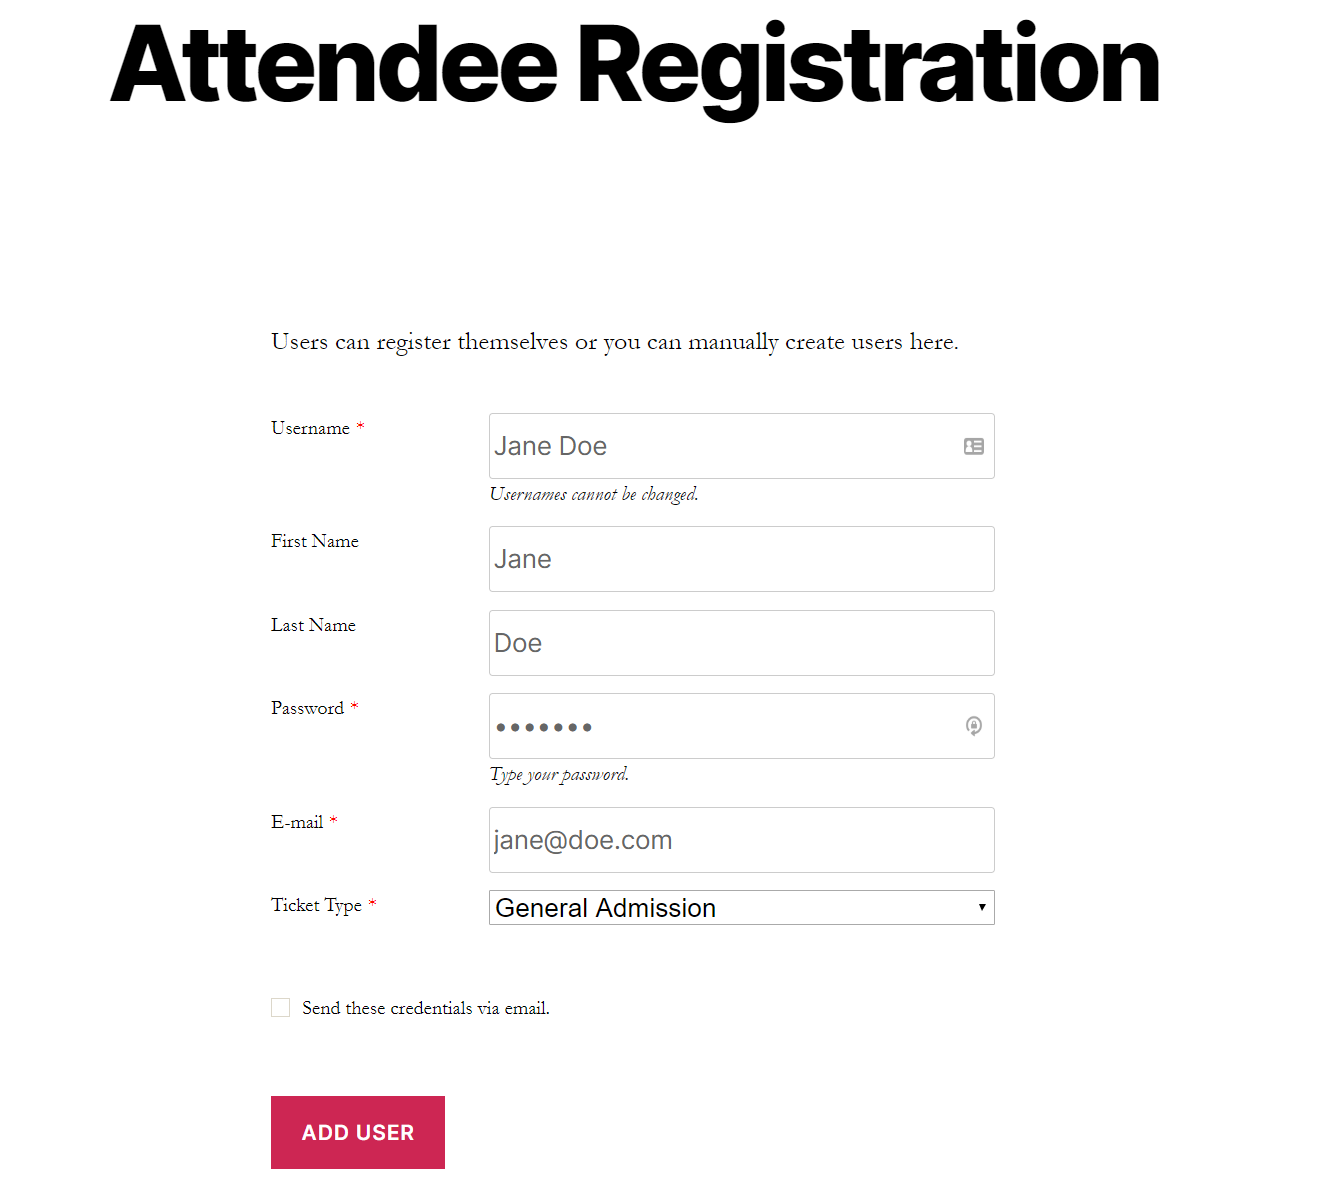
Users can choose to receive their credentials via an email notification. Once the form is submitted, the user will automatically be assigned the user role you selected at the time of creating the form.
Step #6: Restrict access based on user roles
Profile Builder Pro comes with built-in settings to let you restrict user access to content based on user role or the user’s logged-in status.
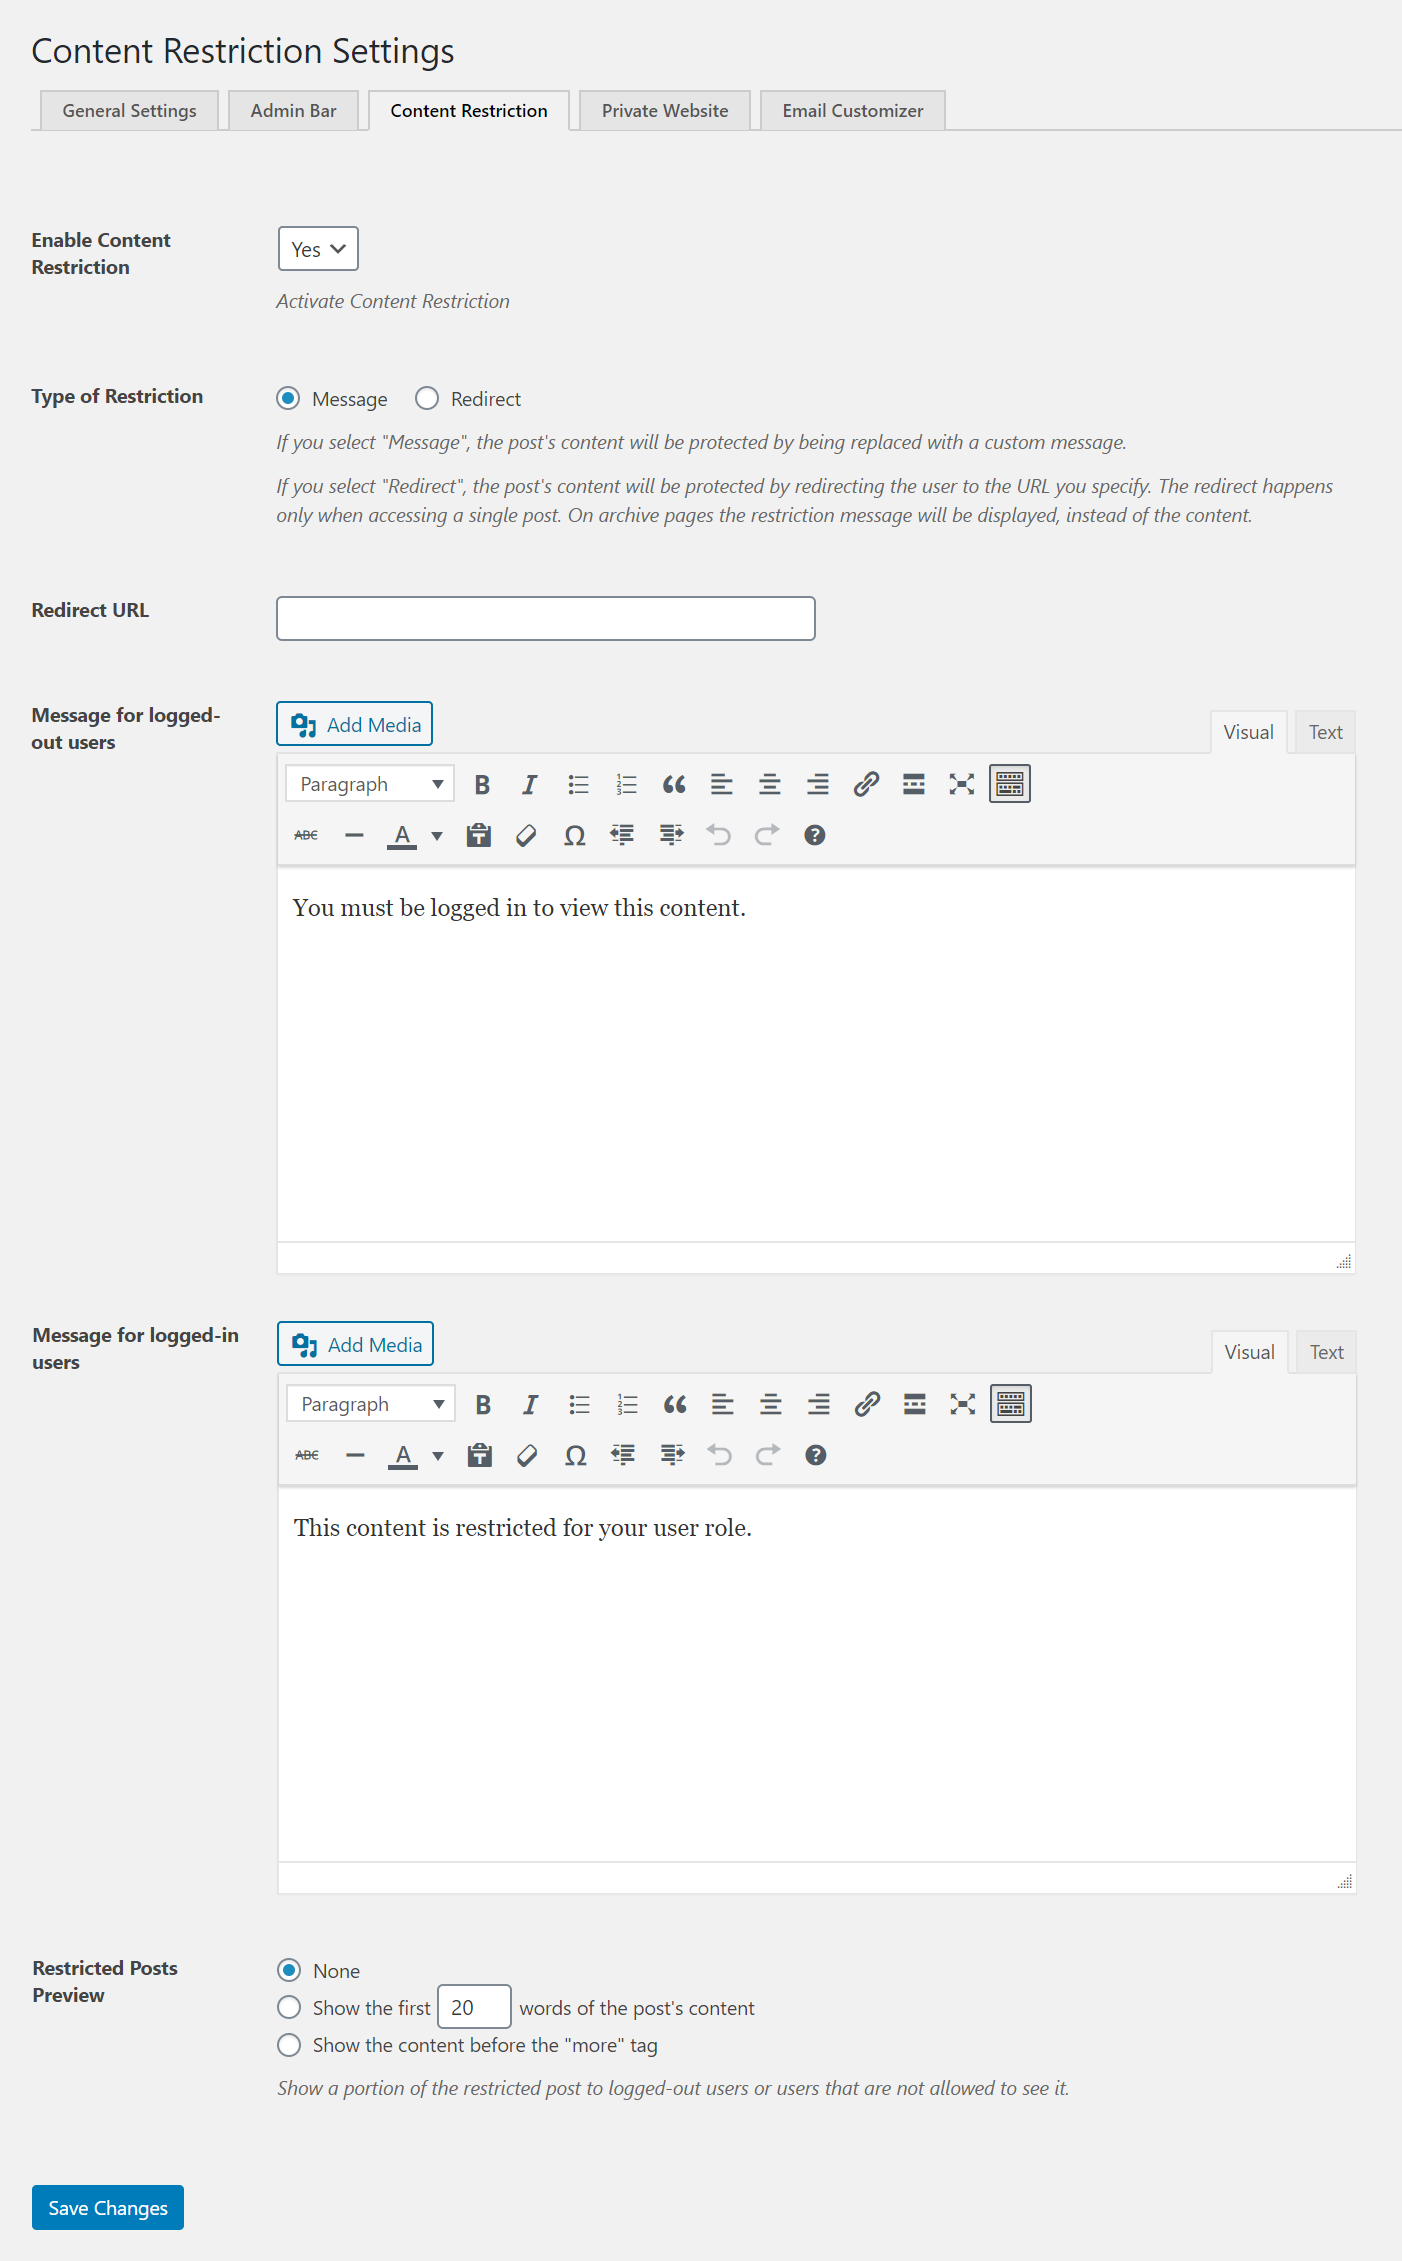
To enable content restriction, go to Profile Builder > Settings > Content Restriction and use the dropdown to set Enable Content Restriction to Yes. From the same screen, you can:
- Choose the type of content restriction.
- Set a redirect URL if you choose to redirect users.
- Customize the messages for logged-out users and logged-in users.
- Configure the restricted posts preview settings.
Click the Save Changes button to proceed.
To restrict user access to a specific page or post, simply open it up in the edit screen and scroll down to the Profile Builder Content Restriction meta box.
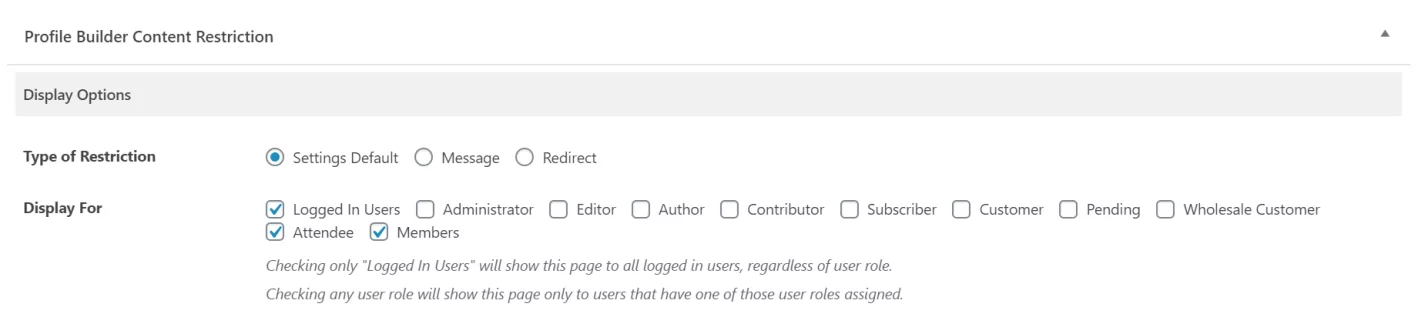
Tick the checkboxes next to the user roles you’d like to make the content available for.
Step #7: Require admin approval and set up email confirmation
The WordPress form builder plugin you use for user registration should also give you options to prevent spam registrations. With Profile Builder Pro, for example, you can require admin approval and set up email confirmation.
Here’s what you need to do:
Go to Profile Builder > Settings from the admin panel and click on the General Settings tab. Set both the “Email Confirmation” Activated and “Admin Approval” Activated options to Yes using the dropdown menu.
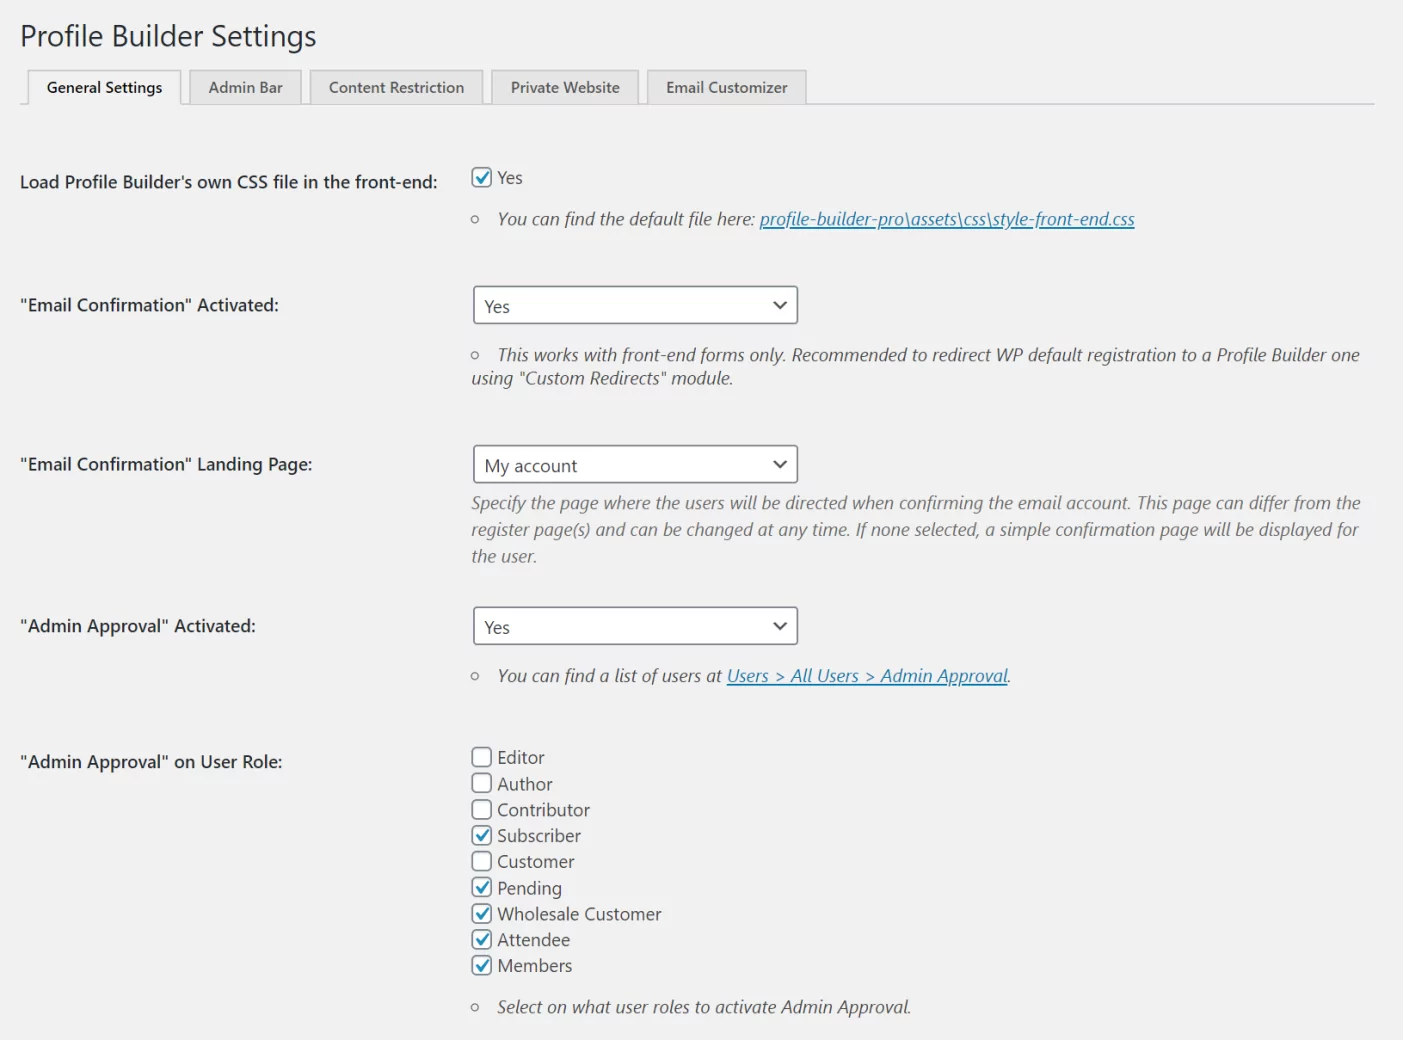
In addition to this, you can choose which “Email Confirmation” Landing Page to redirect users to after they confirm their email address. It also gives you the option to select which user roles to activate admin approval on using the “Admin Approval” on User Role option. Simply tick the checkboxes next to the user roles you’d like to activate admin approval on.
Simplify User Registration with a WordPress Form Builder
Creating a professional user registration experience involves having front-end user registration forms (in some cases, more than one), the option to add extra fields, and configure conditional logic. In addition to this, you should also be able to take necessary measures for spam protection. This might include adding reCAPTCHA to your forms and requiring admin approval.
The Profile Builder Pro WordPress plugin makes it incredibly easy for just about anyone to create custom user registration forms. The best part is that you can modify them in a variety of different ways to get the look and feel you want and deliver a better user experience.
Profile Builder Pro is the best WordPress form builder plugin for anyone looking to create user registration forms in WordPress. The free version of the plugin is great for anyone looking to try it out. It also supports a variety of add-ons that you can use to create advanced forms or complex forms. For example, you can use Profile Builder Pro add-ons to create multi-page forms (or multi-step forms) or set up GDPR preferences. You can also integrate with email marketing services like MailChimp and Campaign Monitor.
Profile Builder Pro
Create beautiful front-end registration and profile forms with custom fields. Setup member directories, custom redirects, cutomize user emails & more using the all in one user management plugin.
Source: https://www.cozmoslabs.com/212069-wordpress-form-builder/